Information
Discover the Exo-Mount Bracket, the ultimate solution for Cybertruck owners seeking to boost their vehicle's utility without sacrificing performance and function. The Exo-Mount Bracket is well known for its compatibility with the Tesla Cybertruck’s tonneau cover, allowing it to stay fully closed without any interference, unlike other flag holders like the Utensil mount and cheap Amazon alternatives. This makes it an ideal option for owners who want a sealed bed, especially for off-roading, reducing dirt ingress. Below is a revised overview of the Exo-Mount Bracket, highlighting its key feature of tonneau cover compatibility, along with installation instructions and additional insights from recent community feedback.
Solving the Cybertruck Mounting Challenge
The Exo-Mount Bracket solves a problem for Cybertruck owners: mounting accessories to the Cybertruck's exoskeleton design without causing interference issues with the tonneau cover, needing modifications, or drilling any holes. Now you can add essential gear without sacrificing functionality. The StarLink base adapter can be mounted to my bracket. with a simple Starlink adapter.
Enhancing Your Cybertruck Experience


Install the Exo-Mount:
- Prepare the Cybertruck’s Bed:
- Locate the L-track within the cargo bed of the Cybertruck, as detailed in the Cybertruck Owner’s Manual. These are the factory mounting points designated for bed accessories.
- Ensure that the tailgate is lowered and clean, and verify that the tonneau cover can operate freely without interference from the whip mount or other accessories.
- Examine the Exo-Mount’s attachment hardware, including stainless steel bolts (SSB) and double stud bolts (DSB), to confirm they are in good condition and finger-tightened. The DSBs are designed to slide onto the L-track system, securing the mount to the bed like other bed-mounted accessories.
- Attach the Exo-Mount to the selected side (either R or L) of the bed onto the L-track using the provided hardware, such as double stud bolts or quick-release knobs, consistent with similar bed-mounted systems.
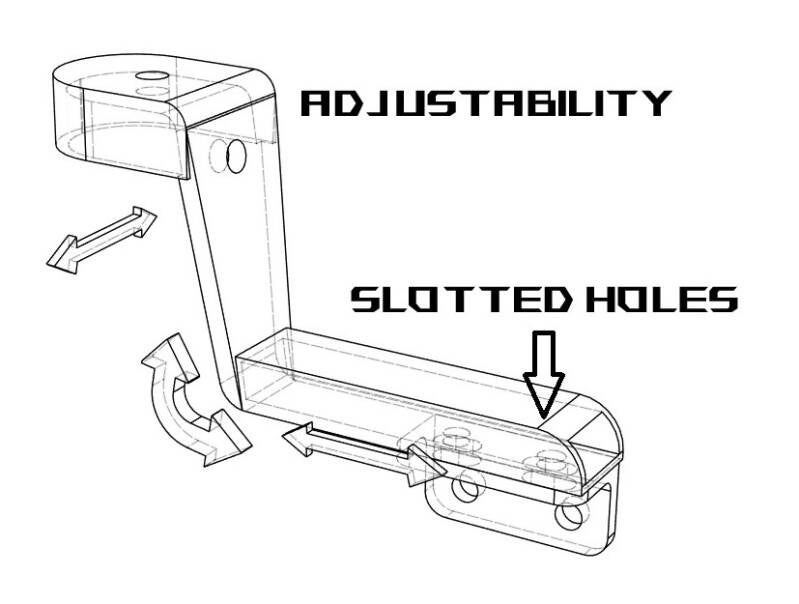
- Brackets are reversible. Skip this part if you don't need to switch the side it was set up for. To do so, remove both stainless-steel short bolts with flat and lock washers and flip the angle iron piece 180 degrees or opposite of how it was, making sure to use the same set of holes, which are the elongated holes, and reposition the 2 bolts back in the same order they were before you removed them. These elongated holes allow for adjustment in the horizontal direction from front to back of the truck. Brackets are normally set up for the left side (driver's side) unless otherwise requested by the buyer, or a pair is ordered. With an order of 2 brackets, we will send a set with one for each side unless otherwise requested. But you can easily make a right side into a left side on your own, no additional parts needed.
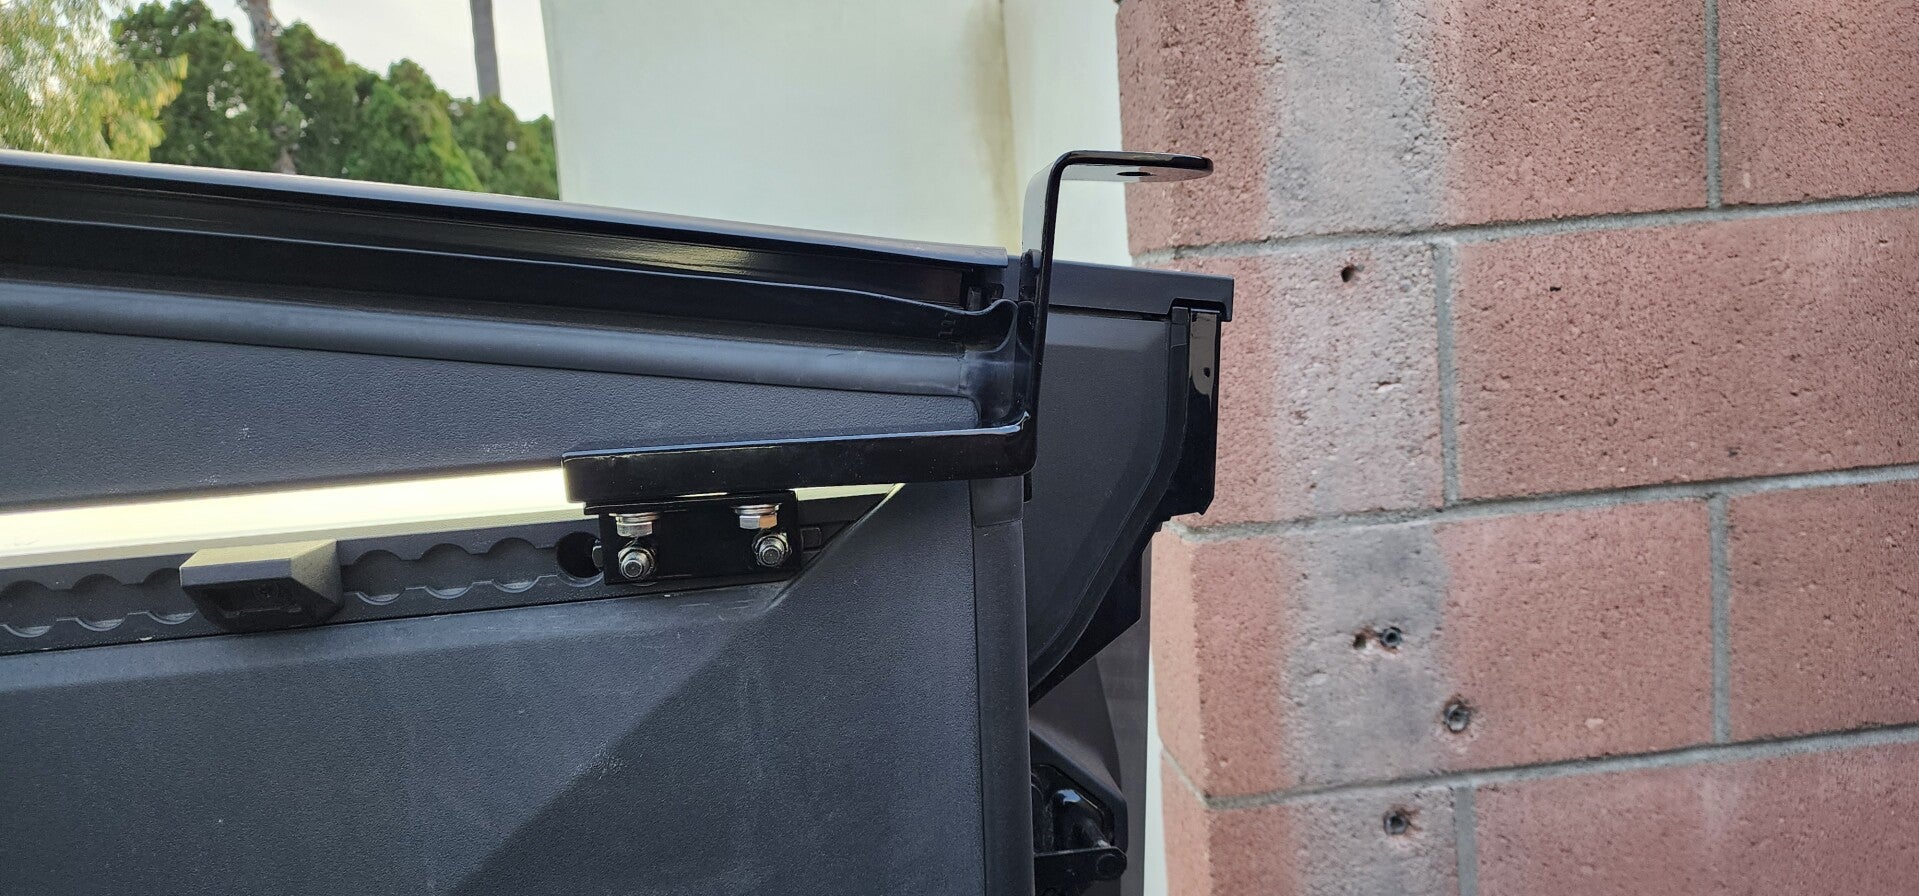
- Position the Exo-Mount at the furthest possible point on the L-track nearest to the tailgate to conserve the full closure of the tonneau cover.
- Tighten the two double stud bolts snug first, ensuring that the washer aligns correctly with the square bolt on the interior side, then check that the tailgate clears the bracket when closing. You should be able to make some adjustments up and down (ref. image below) before tightening these bolts. The other 2 stainless steel bolts will allow for right-to-left and in-and-out adjustment by loosening, making the necessary adjustment, and retightening at the correct position
- Follow the installation instructions provided at www.exo-mount.com, which typically involve minimal tools—either a 9/16" or 14mm wrench—to secure the mount to the track.
- Ensure the mount is securely attached to prevent vibrations or detachment during vehicle operation.
- Attach the High-Visibility Whip:
- The Exo-Mount features a universal mounting interface (such as a central hole for a threaded stud) compatible with accessories like illuminated flagpoles, glow whips, or antennas. Attach an appropriate whip holder, such as a quick-release base with a spring, to the Exo-Mount platform.
- Secure the high-visibility whip (e.g., flagpole, LED whip, or antenna) within the holder, ensuring it remains upright and securely fastened to withstand wind forces at high speeds and on rugged terrain.
Hacks and tips
customer questions
Robert
Thu, Aug 14, 7:58 AM
to me
Armando Padilla
Armando Padilla


Coming soon Version 3
welcome the persision oif cnc machine cut

- Power for Lighted Whips (if applicable):
- If your high-visibility whip includes LED lighting, connect it to the Cybertruck’s bed-mounted power outlets (e.g., 120V or 240V outlets in the vault) or the 4-pin/7-pin trailer plug near the hitch receiver for power, as outlined in the Owner’s Manual.
- Ensure electrical connections are weatherproof to protect the Cybertruck’s 48V electrical system. Avoid using the vehicle’s 48V power feeds (red with blue stripe for positive, brown with blue stripe for ground) directly unless you’re trained in MV electrical systems, as improper handling can cause arcing or damage.
- If your high-visibility whip includes LED lighting, connect it to the Cybertruck’s bed-mounted power outlets (e.g., 120V or 240V outlets in the vault) or the 4-pin/7-pin trailer plug near the hitch receiver for power, as outlined in the Owner’s Manual.
- Verify Clearance and Stability:
- Ensure the whip does not obstruct the tonneau cover, tailgate, or rearview camera visibility
- Test the setup by driving at low speeds to confirm the Exo-Mount and whip remain secure, especially in windy or off-road conditions.
- Check that the whip’s height complies with local vehicle height regulations to avoid fines or safety issues.
- Safety and Maintenance:
- Periodically inspect the Exo-Mount and whip for looseness or wear, particularly after off-road adventures or extended highway driving.
- Ensure the Exo-Mount’s attachment to the L-track remains tight to prevent movement.
- If the whip is removable, store it securely in the Cybertruck’s vault when not in use to protect it from damage or theft. I put mine in between the rear seats when folded up so they don't knock into each other
Lifetime warranty guaranteed
Superior Design and Durability
The Exo-Mount Bracket is superior to existing Cybertruck mounting solutions because it does not interfere with the tonneau cover or tailgate. features a heavy-duty powder coat finish for durability Enjoy a robust and seamless integration with your Cybertruck.
Exo-mount bracket by Armando Padilla, which is designed specifically for mounting accessories like a high-visibility whip to the Tesla Cybertruck’s L-track system. This option is indeed a strong choice for its compatibility with the Cybertruck’s bed and its non-invasive design. Below, I’ll detail how the Exo-mount bracket can be used to mount a high-visibility whip, incorporating its advantages and addressing your specific points about not interfering with the tonneau cover or tailgate.
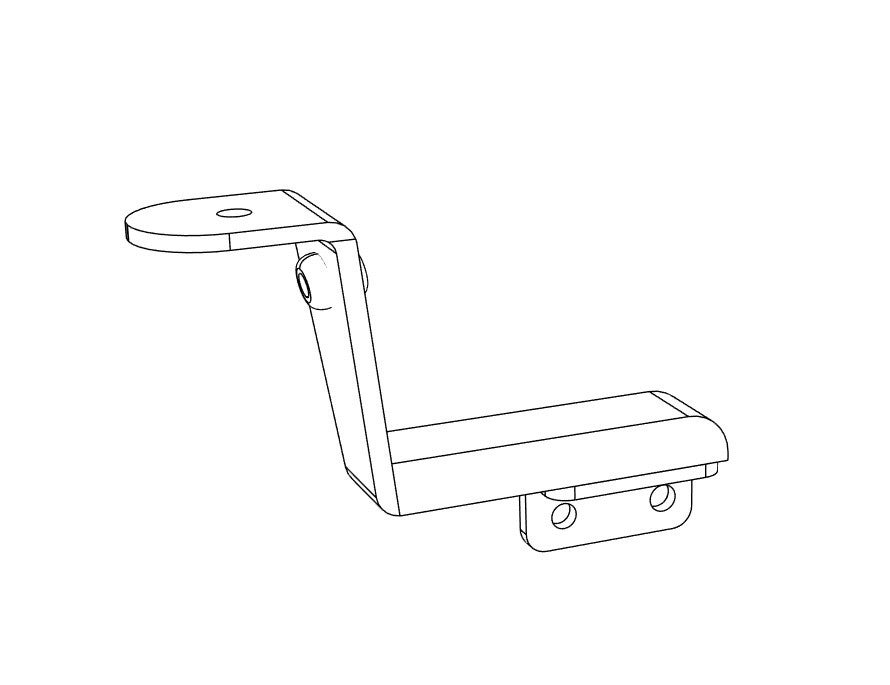
Exo-Mount Bracket for L-Track Installation Description: The Exo-mount bracket, developed by Armando Padilla, is a custom-designed accessory that attaches to the Cybertruck’s L-track system in the truck bed. It provides a secure and versatile mounting point for a high-visibility whip without requiring permanent modifications to the vehicle. Details:
- Hardware: The Exo-mount bracket is engineered to integrate seamlessly with the Cybertruck’s L-track system, which is standard on Cybertruck All-Wheel Drive and Cyberbeast models and available as a $145 accessory for all Cybertruck models. The bracket typically includes a base that locks into the L-track and a mounting point for attaching a whip or flagpole. It’s constructed from durable materials, likely powder-coated steel, and stainless steel bolts to withstand off-road conditions.
- Advantages:
- L-Track Compatibility: The bracket leverages the Cybertruck’s L-track system, allowing for quick installation and removal without drilling or permanent modifications.
- Non-Interference with Tonneau Cover and Tailgate: The Exo-mount is designed to position the whip in a way that does not obstruct the operation of the tonneau cover or tailgate, ensuring full functionality of the bed. This is critical, as many bed-mounted accessories can interfere with the tonneau’s rolling mechanism or tailgate clearance.
- Versatility: The L-track system allows the bracket to be positioned at various points along the bed, offering flexibility in whip placement for optimal visibility or aesthetic preference.
- Durability: Built for rugged use, the Exo-mount is likely designed to handle the vibrations and impacts of off-road driving, making it suitable for high-visibility whips used in demanding environments.
- Considerations:
- Ensure the whip’s height and weight are compatible with the Exo-mount’s load capacity and the L-track’s working load limit (approximately 1,916 lbs per L-track stud fitting, as noted in similar L-track setups).exo-mount uses 2 of these double stud bolts for a combined max load limit of 3832 lbs
- Verify that the whip’s base is compatible with the Exo-mount’s attachment mechanism 1/2" hole(e.g., bolt-on or quick-release).
- Check local regulations for whip height and lighting, especially for on-road use, as some areas have restrictions.
- The Exo-mount may be a premium or custom product, so availability and cost could be factors compared to generic L-track accessories.
- Installation:
- Step 1: Identify the desired L-track position in the Cybertruck bed (left or right side, forward or rearward). The L-track runs along the bed’s side walls, providing multiple mounting points. But the last position is the best place on the track, it's the one nearest the tailgate. This is where you want to put the bracket if you would like to close the tonneau cover all the way
- Step 2: Attach the Exo-mount bracket to the L-track by sliding its locking collars or studs into the track and tightening the bolts, similar to the process described for L-track brackets in the Cybertruck CyberTent installation. Ensure the bracket is secured tightly to prevent movement.
- Step 3: Mount the high-visibility whip to the Exo-mount bracket using the provided attachment point (e.g., bolt-on or clamp mechanism). Confirm that the whip is securely fastened.
- Step 4: Test the tonneau cover and tailgate operation to ensure the whip and bracket do not interfere. Adjust the bracket’s position along the L-track if necessary.
- Step 5: Verify the whip’s stability during low-speed driving or off-road conditions to ensure it remains secure.
Why It’s the Best Option: The Exo-mount bracket stands out as an optimal solution for mounting a high-visibility whip due to its purpose-built design for the Cybertruck’s L-track system, which ensures a secure and adjustable fit without compromising the vehicle’s functionality. Its non-interference with the tonneau cover and tailgate addresses a common issue with bed-mounted accessories, making it ideal for users who need full bed access. Additionally, the L-track’s robust load capacity and the bracket’s heavy-duty, durable construction make it well-suited for off-road use, where high-visibility whips are often required for safety and signaling compliance.
Comparison to Other Options While the Exo-mount bracket is an excellent choice, here’s a brief comparison to the other mounting options previously mentioned to highlight why it may be preferred:
- Hitch-Mounted Whip: While secure and easy to install, a hitch-mounted whip may extend further rearward, potentially affecting aerodynamics or obstructing the rearview camera. The Exo-mount’s bed placement avoids these issues and keeps the whip closer to the vehicle’s structure.
- Bed-Mounted Whip (Generic): Generic bed rail clamps or MOLLE panels will interfere with the tonneau cover. The Exo-mount’s L-track integration is specifically designed to avoid these conflicts.
- Roof-Mounted Whip: Offers high visibility but requires more complex installation (e.g., crossbar setup) and may increase drag, reducing range. The Exo-mount is simpler to install and maintains a lower air resistance profile.
- Aftermarket Bumper-Mounted Whip: Robust but requires replacing the factory bumper or drilling holes, which is costly and invasive. The Exo-mount is non-invasive and leverages existing L-track infrastructure.
- Magnetic/Temporary Mounts like suction cups: Less secure for off-road use and may not adhere well to the Cybertruck’s stainless steel. The Exo-mount provides a more reliable, semi-permanent solution.
- Custom Fabrication: Offers flexibility but is expensive and may involve permanent modifications. The Exo-mount achieves similar customization without altering the vehicle with an optimized design.
The Exo-mount’s combination of ease of installation, compatibility with the L-track, and non-interference with the tonneau cover and tailgate makes it a superior choice for many Cybertruck owners.
- Rear Camera Consideration: The Exo-mount’s bed placement should minimize interference with the rearview camera, unlike some hitch or bumper-mounted solutions. Always test visibility after installation. exo-mount does not get into any of the camera views on the Cybertruck.
Final Recommendation: The Exo-mount bracket by Armando Padilla is likely the best option for mounting a high-visibility whip to a Tesla Cybertruck due to its seamless integration with the L-track system, ease of installation, and design that avoids interference with the tonneau cover and tailgate. To proceed, acquire the Exo-mount bracket, follow the installation steps outlined above. For further details on sourcing the Exo-mount or to confirm its specifications, check with Armando Padilla’s official site, Exo-mount.com, or forums like cybertruckownersclub.com.
Sources: Information on L-track compatibility and installation draws from Cybertruck Owners Club discussions and Tesla’s accessory documentation.
General information on mounting flags or glow whips to CT.
Mounting a high-visibility whip (such as a flag or light whip) to a Tesla Cybertruck requires careful consideration due to the vehicle’s unique stainless steel exoskeleton, limited traditional mounting points, and aerodynamic design. Below are several options for mounting a high-visibility whip, based on available information and practical approaches for the Cybertruck. Each option is evaluated for compatibility with the vehicle’s structure, functionality, and potential aftermarket accessories.
1. Hitch-Mounted Whip Description: Use the Cybertruck’s 2-inch trailer hitch receiver to mount a whip via a hitch-mounted flagpole or whip holder. This is one of the most straightforward and secure options, as the hitch is designed to handle significant loads (up to 1,100 lbs tongue weight). Details:
- Hardware: Purchase a hitch-mounted flagpole or whip holder, such as those used for off-road vehicles or ATVs. These typically include a 2-inch receiver-compatible base and a pole mount for the whip.
- Advantages:
- Easy to install and remove without modifying the vehicle.
- No drilling or permanent alterations required.
- Secure, as the hitch is chassis-mounted and robust.
- Considerations:
- Ensure the whip’s height and weight comply with the hitch’s maximum tongue weight and overhang limits (49 inches from the center of the rear tire).
- Check local regulations, as some areas restrict the height or type of hitch-mounted accessories for on-road use.
- The whip may obstruct the rearview camera slightly, so test visibility.
- Example Products:
- Generic hitch flagpole mounts (available on Amazon or off-road accessory retailers).
- Aftermarket Cybertruck-specific hitch accessories from brands like Unplugged Performance, which offers a Hardcore Trailer Hitch Receiver for enhanced durability.
- Installation:
- Remove the trailer hitch cover (attached with three turn clips) using a flat trim tool.
- Insert the hitch-mounted whip holder and secure it per the manufacturer’s instructions.
- Attach the high-visibility whip to the holder.
2. Bed-Mounted Whip Description: Mount the whip to the Cybertruck’s cargo bed, either on the bed rails or using aftermarket MOLLE panels or accessories. Details:
- Hardware: Use a bed rail clamp or a MOLLE panel mount designed for off-road vehicles. Unplugged Performance offers a modular HD Rear Bumper system with swing arms and MOLLE panels, which can be adapted to mount a whip.
- Advantages:
- Provides a stable mounting point without drilling into the exoskeleton.
- MOLLE panels offer flexibility for attaching various accessories, including whip mounts.
- Positions the whip higher for better visibility, especially with the tonneau cover open.
- Considerations:
- Ensure the whip mount is securely fastened to prevent vibration or detachment during off-road driving.
- The bed’s design lacks traditional tie-down points, so aftermarket solutions like D-rings or MOLLE panels may be necessary.
- May require professional installation for aftermarket bumpers or panels.
- Example Products:
- Unplugged Performance INVINCIBLE® HD Rear Bumper with Swing Arms and MOLLE panels.
- Generic bed rail clamps or flagpole mounts compatible with the Cybertruck’s bed dimensions.
- Installation:
- Attach a clamp or MOLLE panel to the bed rail or aftermarket bumper.
- Secure the whip base to the clamp or panel using bolts or quick-release mounts.
- Ensure the whip does not interfere with the tonneau cover operation or tailgate.
3. Roof-Mounted Whip Description: Mount the whip to the Cybertruck’s roof using the OEM crossbar mounting points or aftermarket roof rails. Details:
- Hardware: The Cybertruck has eight applique doors on the roof for crossbar installation, which can be used to mount a whip with a compatible roof rack or custom bracket. Aftermarket roof rails with MOLLE panels, such as those from Unplugged Performance, can also support whip mounts.
- Advantages:
- Offers the highest mounting point for maximum visibility.
- Compatible with off-road use, as roof mounts are designed for rugged conditions.
- Can integrate with existing roof accessories like light bars.
- Considerations:
- Installation may require removing roof appliques and securing brackets with a torque wrench, as per Tesla’s instructions.
- Ensure the whip’s weight and drag do not exceed the roof’s load capacity or affect aerodynamics significantly.
- Check for potential interference with the roof-mounted off-road light bar (if installed).
- Example Products:
- Tesla Cybertruck Crossbar Kit (OEM accessory).
- Unplugged Performance Roof Rails with MOLLE Panel Rack.
- Generic roof flagpole mounts designed for off-road vehicles.
- Installation:
- Open the roof applique doors and secure a crossbar or roof rail per Tesla’s instructions.
- Attach a whip mount to the crossbar or rail using clamps or bolts.
- Secure the high-visibility whip and test for stability.
4. Aftermarket Bumper-Mounted Whip Description: Use an aftermarket bumper, such as the Unplugged Performance INVINCIBLE® HD Rear Bumper, which includes integrated mounting points like Hi-Lift jack points or swing arms that can be adapted for a whip.Details:
- Hardware: The Unplugged Performance HD Rear Bumper is made of high-strength carbon steel and offers modular features like swing arms and MOLLE panels, which can support a whip mount.
- Advantages:
- Robust and designed for off-road durability, ideal for rugged environments.
- Swing arms optimize rearview camera visibility while providing a secure mounting surface.
- Can be combined with other accessories like LED flood lights for enhanced visibility.
- Considerations:
- Requires replacing the factory plastic bumper, which may be costly and involve professional installation.
- Ensure the whip mount does not interfere with the bumper’s recovery points or jack points.
- Example Products:
- Unplugged Performance INVINCIBLE® HD Rear Bumper with optional swing arms and MOLLE panels.
- Installation:
- Install the aftermarket bumper per the manufacturer's instructions, attaching it directly to the chassis.
- Use the swing arm or MOLLE panel to mount the whip base.
- Secure the whip and verify stability during off-road conditions.
5. Magnetic or Temporary Mounts Description: Use a magnetic or suction-cup mount to attach the whip to the Cybertruck’s stainless steel body, typically on the hood or roof.Details:
- Hardware: Magnetic flagpole mounts or suction-cup mounts designed for temporary use on vehicles.
- Advantages:
- Non-invasive, requiring no drilling or permanent modifications.
- Easy to reposition or remove when not needed.
- Considerations:
- The Cybertruck’s stainless steel exoskeleton may not be as magnetic as standard steel, so test the magnet’s strength before use.
- Suction cups may not adhere well to the textured exoskeleton or in extreme weather conditions.
- Not ideal for high-speed or off-road use due to potential detachment.
- Example Products:
- Generic magnetic flagpole mounts (available on Amazon or off-road retailers).
- Suction-cup flag mounts for temporary applications.
- Installation:
- Clean the mounting surface (hood or roof) to ensure a strong hold.
- Attach the magnetic or suction-cup base and secure the whip.
- Test stability at low speeds before regular use.
6. Custom Fabrication Description: Create a custom mounting bracket for the whip, tailored to the Cybertruck’s specific mounting points or aesthetic.Details:
- Hardware: Work with a fabricator to design a bracket that attaches to existing chassis points, bed rails, or roof appliques. This could involve welding or bolting a custom mount.
- Advantages:
- Fully customizable to your needs and the whip’s specifications.
- Can be designed to integrate seamlessly with the Cybertruck’s angular design.
- Considerations:
- Requires professional fabrication, which can back up delivery times and be expensive.
- Ensure the custom mount complies with Tesla’s service guidelines to avoid warranty issues.
- May involve drilling or modifying the vehicle, which could affect resale value.
- Installation:
- Consult with a professional fabricator to design and install the mount.
- Secure the whip to the custom bracket and test for durability.
Key Considerations
- Rear Visibility: The Cybertruck’s rear visibility is limited, especially with the tonneau cover closed, relying heavily on the rearview camera. Ensure the whip does not obstruct the camera or exacerbate blind spots.
- Regulations: Check local laws for on-road use of high-visibility whips, as some regions restrict height, lighting, or placement for safety reasons.
- Off-Road Use: If using the whip for off-road activities, ensure the mount can withstand vibrations and impacts. Aftermarket solutions like Unplugged Performance’s HD Rear Bumper are designed for rugged conditions.
- Aerodynamics and Range: Whips, especially tall ones, can increase drag and reduce the Cybertruck’s range. Consider removable mounts to minimize impact when not needed.
- Warranty and Modifications: Permanent modifications (e.g., drilling) may affect Tesla’s warranty. Opt for non-invasive mounts where possible or consult Tesla’s service guidelines.
Recommended Products and Sources
- Unplugged Performance INVINCIBLE® HD Rear Bumper: Offers modular mounting options with swing arms and MOLLE panels.
- Tesla Cybertruck Crossbar Kit: OEM solution for roof-mounted accessories.
- Generic Hitch Flagpole Mounts: Widely available from off-road retailers or Amazon.
- Tesla Service Manuals: Reference for DIY installation of accessories
Final Recommendation For ease and reliability, a hitch-mounted whip is the best starting point, as it leverages the Cybertruck’s robust trailer hitch without requiring modifications. For off-road enthusiasts, the Unplugged Performance HD Rear Bumper with MOLLE panels offers a durable and versatile solution. If maximum visibility is needed, a roof-mounted whip using OEM crossbars or aftermarket rails is ideal but requires careful installation. Always test mounts for stability and ensure compliance with local regulations. For specific product details or pricing, check retailers like unpluggedperformance.com or shop.tesla.com, or contact a Tesla service center for guidance.
Exclusive Offer
Get your Exo-Mount Bracket now and experience the perfect blend of functionality and durability. As a special introductory offer, enjoy a discount on your first purchase! contact me before you buy me, and I will offer a 10% discount to first-time buyers.